During my college years, I developed a deep fascination with both RISC-V architecture and Common Lisp programming. RISC-V’s elegant, open instruction set architecture (ISA) made assembly programming more approachable compared to x86, while Common Lisp’s powerful metaprogramming capabilities opened my eyes to new programming paradigms.
Recently, I found myself wanting to explore how these two technologies intersect. Specifically, I was curious to examine how Common Lisp programs compile down to RISC-V assembly through SBCL (Steel Bank Common Lisp). Understanding the generated assembly code could provide insights into both SBCL’s compilation strategies and RISC-V’s instruction set usage in practice.
This writeup documents my journey of setting up an environment for SBCL development on RISC-V architecture, with a focus on being able to examine the assembly output. While primarily a learning exercise, it may prove useful for others interested in Common Lisp implementation details or RISC-V assembly programming.
SBCL Cross-Compiling Terminology
SBCL: A Common Lisp compiler. Project page: https://www.sbcl.org/
Bootstrap: In compiler development, the process of first building a minimal “host” compiler by some special means, then using it to compile the full compiler.
contrib: The extension libraries shipped with SBCL.
Build SBCL on RISC-V
Preparation
According to the official cross-compilation guide, building SBCL requires an existing, older SBCL for bootstrapping. On platforms without a native SBCL binary, you must either:
-
Use a third-party Lisp implementation (e.g., CLISP) to compile SBCL, or
-
Use SBCL on another system/platform to cross-compile for RISC-V, then build contrib natively on the target.
Research showed that option 1 demands matching very specific versions and that natively compiling SBCL under QEMU RISC-V takes 3–4 hours. Therefore, this guide focuses on option 2.
Steps & Pitfalls
-
Set up a RISC-V VM
Create a working directory, where we’ll download files
mkdir riscv64-linux
cd riscv64-linux
Download pre-built ubuntu image and uncompress
wget https://cdimage.ubuntu.com/releases/noble/release/ubuntu-24.04.2-preinstalled-server-riscv64.img.xz
xz -dk ubuntu-24.04.2-preinstalled-server-riscv64.img.xz
The original image size is not enough for image building, we need enlarge it first.
qemu-img resize -f raw ubuntu-24.04.2-preinstalled-server-riscv64.img +5GBoot RISC-V qemu vm in NAT mode, you’ll most likely get an IP address that starts with 10.0.2.NUM/24.
qemu-system-riscv64 \
  -machine virt -nographic -m 2048 -smp 4 \
  -kernel /usr/lib/u-boot/qemu-riscv64_smode/uboot.elf \
  -netdev user,id=net0,hostfwd=tcp::2222-:22 \
  -device virtio-net-device,netdev=net0 \
  -drive file=ubuntu-24.04.2-preinstalled-server-riscv64.img,if=virtio,format=raw
Login with the user ubuntu and the default password ubuntu; you will be asked to choose a new password
Install and configure ssh on the ubuntu vm.
sudo apt install ssh
sudo systemctl enable --now ssh
Then on your host, test the ssh connection,
ssh -p 2222 ubuntu@localhost -
Configure SSH access
- Interactively generate an ed25519 SSH keypair on the host.
ssh-keygen - Copy the public key into the VM’s
/home/ubuntu/.ssh/authorized_keys.ssh-copy-id -p 2222 ubuntu@localhost
- Interactively generate an ed25519 SSH keypair on the host.
-
Clone SBCL on the VM
git clone https://git.code.sf.net/p/sbcl/sbcl /home/ubuntu/sbcl -
Clone SBCL on the host
cd riscv64-linux git clone https://git.code.sf.net/p/sbcl/sbcl -
Run the cross-make script on the host
cd sbcl sh cross-make.sh -p 2222 sync ubuntu@localhost /home/ubuntu/sbcl "GNUMAKE=gmake SBCL_ARCH=riscv64 CFLAGS='-fsigned-char'"- sync ensures the VM’s and host’s SBCL source are identical (it uses the VM’s repo HEAD).
- The SBCL_ARCH and CFLAGS variables set the target architecture and compiler flags.
You might get an error about GNU Make not being found. To fix this, install the
build-essentialpackage on the guest ubuntu vmsudo apt install build-essentialRe-run the
cross-make.shscript again:sh cross-make.sh -p 2222 sync ubuntu@localhost /home/ubuntu/sbcl "GNUMAKE=gmake SBCL_ARCH=riscv64 CFLAGS='-fsigned-char'"And you will get some output that looks similar to this with the error: “No such file or directory”
+ ./generate-version.sh
+ ssh -p 2222 ubuntu@localhost cd /home/ubuntu/sbcl ; git checkout 8c0820b1ac2f20cc491b8e83ae20604f8da3b488 && GNUMAKE=gmake SBCL_ARCH=riscv64 CFLAGS='-fsigned-char' sh make-config.sh && mv version.lisp-expr remote-version.lisp-expr
HEAD is now at 8c0820b1a Slightly less branching in EQUAL.
rm -f *~ *.bak *.orig \#*\# .\#* texput.log *.fasl
rm -rf sbcl asdf "docstrings/"
rm -f  sbcl.html asdf.html
rm -f contrib-docs.texi-temp
rm -f package-locks.texi-temp
rm -f variables.texinfo
rm -f sbcl.ps asdf.ps sbcl.pdf asdf.pdf html-stamp tempfiles-stamp
rm -f asdf.aux asdf.cp asdf.cps asdf.fn asdf.fns asdf.ky asdf.log asdf.pg asdf.toc asdf.tp asdf.tps asdf.vr asdf.vrs sbcl.aux sbcl.cp sbcl.cps sbcl.fn sbcl.fns sbcl.ky sbcl.log sbcl.pg sbcl.toc sbcl.tp sbcl.tps sbcl.vr sbcl.vrs
rm -f sbcl.info sbcl.info-* asdf.info
rm -rf *.include *.info *.pdf *~ *.cp *.fn *.ky *.log *.pg *.toc \
        *.tp *.vr *.aux *.eps *.png *.dvi *.ps *.txt *.fns \
        html-stamp sbcl-internals/
//entering make-config.sh
//ensuring the existence of output/ directory
//guessing default target CPU architecture from host architecture
//setting up CPU-architecture-dependent information
sbcl_arch="riscv"
//initializing /home/ubuntu/sbcl/local-target-features.lisp-expr
//setting up OS-dependent information
gmake: Entering directory '/home/ubuntu/sbcl/tools-for-build'
cc -I../src/runtime -fsigned-char    determine-endianness.c  -ldl -Wl,-no-as-needed -o determine-endianness
gmake: Leaving directory '/home/ubuntu/sbcl/tools-for-build'
//finishing /home/ubuntu/sbcl/local-target-features.lisp-expr
+ scp -P 2222 ubuntu@localhost:/home/ubuntu/sbcl/{remote-version.lisp-expr,local-target-features.lisp-expr,output/build-id.inc} .
scp: /home/ubuntu/sbcl/{remote-version.lisp-expr,local-target-features.lisp-expr,output/build-id.inc}: No such file or directory
Investigation shows:
scp -P 2222 ubuntu@localhost:/home/ubuntu/sbcl/{remote-version.lisp-expr,local-target-features.lisp-expr,output/build-id.inc} .is passed literally, and you end up looking for a file called
/home/ubuntu/sbcl/{remote-version.lisp-expr,local-target-features.lisp-expr,output/build-id.inc} -
Resolve the build issue:
Re-run the cros-make script using bash so that you get brace expansion:
bash cross-make.sh -p 2222 sync ubuntu@localhost /home/ubuntu/sbcl "GNUMAKE=gmake SBCL_ARCH=riscv64 CFLAGS='-fsigned-char'"You will most likely run into the missing
outputdirectory issue after fixing brace expansion issue.You’ll see:
+ scp -P 2222 ubuntu@localhost:/home/ubuntu/sbcl/remote-version.lisp-expr ubuntu@localhost:/home/ubuntu/sbcl/local-target-features.lisp-expr ubuntu@localhost:/home/ubuntu/sbcl/output/build-id.inc . remote-version.lisp-expr 100% 189 117.8KB/s 00:00 local-target-features.lisp-expr 100% 496 258.7KB/s 00:00 build-id.inc 100% 36 18.6KB/s 00:00 + mv build-id.inc output + sh make-host-1.sh //entering make-host-1.sh make-host-1.sh: 24: .: cannot open output/build-config: No such file -
Resolve the missing
outputdirectory issue.Fix:
wget https://raw.githubusercontent.com/fedora-riscv/sbcl-build-docs/refs/heads/main/sbcl-cross-make.patch git apply sbcl-cross-make.patch rm -rf output mkdir output -
Re-run the cross-make script
bash cross-make.sh -p 2222 sync ubuntu@localhost /home/ubuntu/sbcl "GNUMAKE=gmake SBCL_ARCH=riscv64 CFLAGS='-fsigned-char'" -
Resolve
sbcl: not founderrorThe “sbcl: not found” is coming from your host (the Kali VM), not the RISC-V target. The
make-host-1.shstep needs a working SBCL on the machine where you invokedcross-make.shso it can build the C runtime and do the first “genesis” pass.- Install SBCL on your host (or otherwise make a host‐side SBCL available in your
PATH):sudo apt install sbcl
This gives you the “stage-0” SBCL compiler that the cross-make process uses to build the stage-1 compiler for RISC-V.
Re-run the cross-make script
bash cross-make.sh -p 2222 sync ubuntu@localhost /home/ubuntu/sbcl "GNUMAKE=gmake SBCL_ARCH=riscv64 CFLAGS='-fsigned-char'"Once the host build finishes, you’ll have a stage-1 SBCL compiler in the VM’s
/home/ubuntu/sbcldirectory. - Install SBCL on your host (or otherwise make a host‐side SBCL available in your
-
Build the
contriblibraries on the ubuntu VMcd /home/ubuntu/sbcl sh make-target-contrib.shYou’ll see a flood of binary gibberish on your terminal.
-
Work around the broken run-program output parameter
Extensive debugging revealed that SBCL’s run-program function (used to concatenate files via cat) ignores its
:outputargument and always writes to stdout. This pollutes the terminal. -
Apply the make-contrib patch
wget https://raw.githubusercontent.com/fedora-riscv/sbcl-build-docs/refs/heads/main/sbcl-make-contrib.patch git apply sbcl-make-contrib.patch -
Create the missing sbcl-home directory
cd /home/ubuntu/sbcl mkdir -p obj/sbcl-home -
Clean and rebuild
Before each build, run:
./clean.shThen repeat steps 5–13. You should now produce a preliminary SBCL binary and the contrib libraries.
-
Prepare for full bootstrap
Run the following on the ubuntu vm
cp -r /home/ubuntu/sbcl /home/ubuntu/sbcl-new
cd /home/ubuntu/sbcl-new
sh clean.sh
mkdir -p obj/sbcl-home
SBCL_ARCH=riscv64 CFLAGS="-fsigned-char" \
  sh make.sh --xc-host='/home/ubuntu/sbcl/run-sbcl.sh' --arch="riscv64"
If you build and are able to run
make.shon SBCL, you will get the following message:The build seems to have finished successfully, including 19 contributed modules. If you would like to run more extensive tests on the new SBCL, you can try: cd ./tests && sh ./run-tests.sh To build documentation: cd ./doc/manual && make To install SBCL (more information in INSTALL): sh install.sh //build started: Tue May 6 16:41:55 UTC 2025 //build finished: Tue May 6 17:08:55 UTC 2025To install
sbclrunsh install.sh, you might need to runsudo sh install.shif you are running as a regular user.
Disassembling Common lisp code
Here are two classic Common Lisp implementations of the Fibonacci function:
Simple recursive version
;; fib-recursive: exponential time
(defun fib-recursive (n)
  "Return the Nth Fibonacci number (0-indexed) recursively."
  (if (<= n 1)
      n
      (+ (fib-recursive (- n 1))
         (fib-recursive (- n 2)))))
Iterative version using LOOP
;; fib-iterative: linear time, constant space
(defun fib-iterative (n)
  "Returns the Nth Fibonacci number (0-indexed) in O(N) time."
  (cond ((< n 0) (error "Input must be a non-negative integer"))
        ((= n 0) 0)
        ((= n 1) 1)
        (t (let ((a 0)
                 (b 1))
             (loop for i from 2 to n
                   do (let ((temp (+ a b)))
                        (setf a b)
                        (setf b temp)))
             b))))
Usage
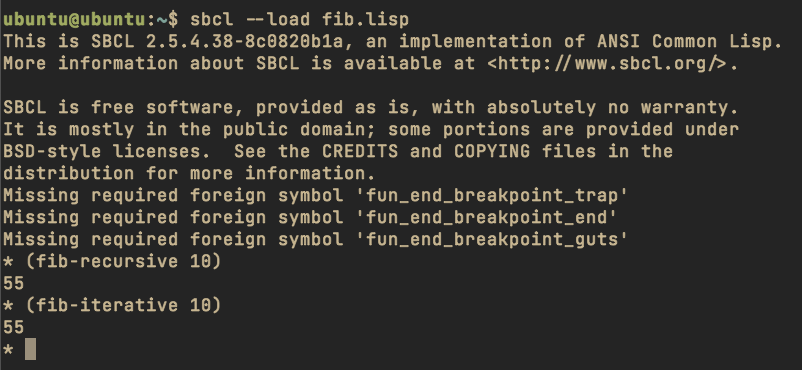
* (fib-recursive 10)  ; => 55
* (fib-iterative 10)  ; => 55
You can put these definitions in a file, say fib.lisp, and load them into SBCL via:
sbcl --load fib.lisp
Then call (fib-iterative N) or (fib-recursive N) at the REPL.
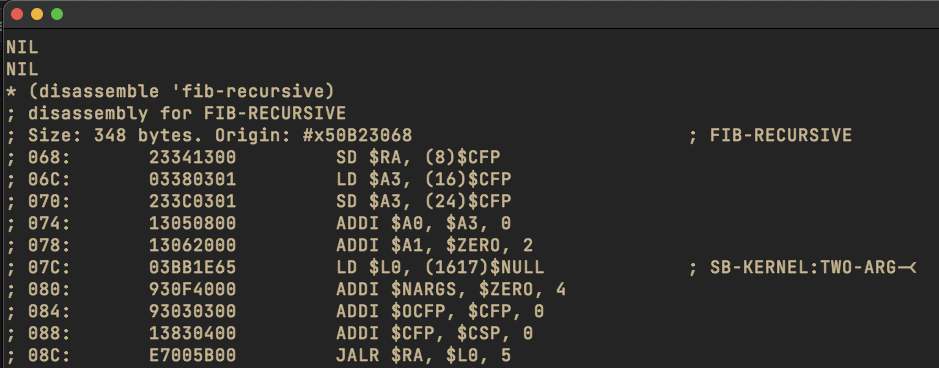
In SBCL you can use the built-in disassembler at the REPL. Just make sure your function is compiled, then call disassemble on it. For example, assuming you’ve already defined the two versions:
(compile 'fib-recursive)
(compile 'fib-iterative)

;; now disassemble them
(disassemble 'fib-recursive)
(disassemble 'fib-iterative)
Sources
https://github.com/fedora-riscv/sbcl-build-docs
https://canonical-ubuntu-boards.readthedocs-hosted.com/en/latest/how-to/qemu-riscv/
https://risc-v-getting-started-guide.readthedocs.io/en/latest/linux-qemu.html
https://fiveop.de/blog/sbcl-on-fedora-on-riscv-qemu-on-arch-linux-x86_64.html
https://fedoraproject.org/wiki/Architectures/RISC-V/Installing
]]>